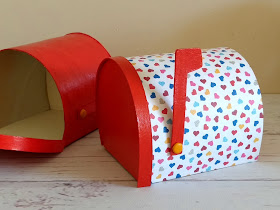
To make one, you will need:
- An empty Pringles tube (wiped clean inside)
- Cereal box card
- Acrylic paints
- Soft paintbrushes
- Super glue / hot glue gun
- Craft knife
- Ruler
- Bradawl
- Split pin / brad
- Acylic gloss varnish
- Thin coloured paper (optional)
Watch my video tutorial to see me making this colourful (coloured paper) version, or follow the intructions below for the red painted version:
First, cut off the metal base using a sharp craft knife. Then measure 10cm up from the base and cut around the tube.
Cut along the length of the tube and open it out. Straighten the cut ends slightly to form more of an arched shape.
Next, measure a piece of cereal box card approximately 8.5cm wide by 10cm. At each end of the card, measure a square approximately 10cm x 10cm to cover both ends. Cut this out and attach the base to the tube (as shown below) with super glue or a hot glue gun.
Fold the card up at one end and draw around the shape of the curve. Cut this out. Glue another piece of card underneath it and cut around it leaving a thin border if you wish.
Glue this to the end of the tube using super glue or a hot glue gun. I used a few bits of masking tape to hold it in place whilst it dried.
For the front end, fold the card up and draw around the curved shape. Cut this out and cut another one out exactly the same size. Glue them together with printed sides facing each other.
Cut two strips of cereal box card approximately 1cm x 28cm and glue together (printed sides facing). Bend the strips slightly before the glue dries. Then glue this around the front end so that it overhangs slightly on the outside (see below). Use masking tape to hold in place until dry, then trim off the ends.
Apply two thick layers of acrylic paint to the outside of the box and leave to dry. Then apply a thin coat of acrylic gloss varnish.
Alternatively, paint the ends and the base, and cover the curved part of the box with thin, coloured paper. See my video for more details on how I did this.
Make a flag from a double layer of cereal box card (glue printed sides together), paint it red and varnish. My flag is approximately 8cm x 1cm, and 2cm at the top.
Using a bradawl, make a hole in the thin end of the flag and one in the side of the box. Push a split pin or brad through the holes and secure loosely inside the box. Ensure that the flag moves freely.
And there it is! Your mailbox is complete! The front opening (lid) should stay closed on its own due to the layers of paint and varnish, but if it does keep coming open, just apply a small blob of super glue or hot glue to the inside of the lid and allow to dry before closing.


No comments:
Post a Comment