Showing posts with label Paper flower. Show all posts

Monday, 25 August 2025

3D Rolled Paper Flowers

Let me ask you something. What's the quickest and easiest way to add a touch of elegance to your gift packaging? Paper flowers, of course! These 3D rolled versions are so super cute, and can be used for any number of papercraft projects 🌸

A colourful display of pink and lilac 3D rolled paper flowers of different sizes on a dark grey background

I have a lovely set of 12 rolled flower templates available. They come in SVG, PNG and PDF format, making them accessible for a variety of crafting needs.

Thursday, 15 February 2024

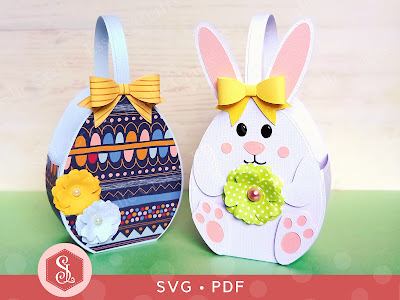
Easter Egg Baskets

These adorable Easter Baskets are so delightfully versatile and can be filled with chocolate eggs or other Easter treats! Easy to assemble, you can choose to make the baskets as an Easter egg or as a cute Easter bunny, then decorate them with beautiful paper flowers and bows! Plus, if you leave the handle off they become Easter boxes, perfect for table favours! 🐰


Very similar in style to my Butterfly Favour Bag there are separate panels to decorate and strengthen the front, back and two sides.


Available from my Etsy shop, the template comes as an SVG cut file, as well as a PDF if you prefer to cut out by hand. 


To make one of these fabulous baskets, you will need:

Easter Egg Baskets template (PDF and SVG available)
* Computer and printer to print the PDF templates and instructions
* Double-sided cardstock (220-250gsm / 80-92lb recommended)
* Patterned card (220-250gsm / 80-92lb recommended)
* Craft glue / double-sided tape

If you are not using a cutting machine, you will also need:

* Craft knife / scissors
* Scoring tool
* Ruler

Watch my video tutorial showing how to assemble the baskets:


TIP 1 : Use dimensional foam or three layers of scrap cardstock (as shown) to attach the bunny's feet and arms to the front of the basket.

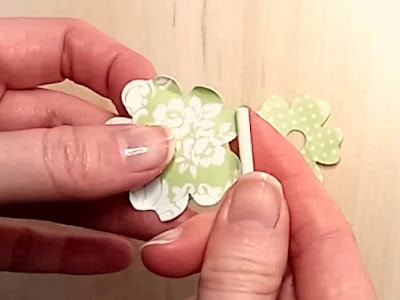
TIP 2 : Add shape to the flower pieces using a cocktail stick or a thin, round lolly stick.


TIP 3 : Make a smaller paper flower in the same colour as the bunny and glue it to the back of the basket for a cute little tail!


The baskets measure approximately 9.3cm (W) x 16.5cm (H) x 4.3cm (D) / 3.6" (W) x 6.5" (H) x 1.7" (D), however, this is only meant as a guide, as the templates can easily be re-sized to suit your needs.

I hope that I have inspired you to create your own little Easter baskets using my template and I can't wait to see what you fill them with! 🐰

Happy crafting
Suzanne

Wednesday, 1 November 2023

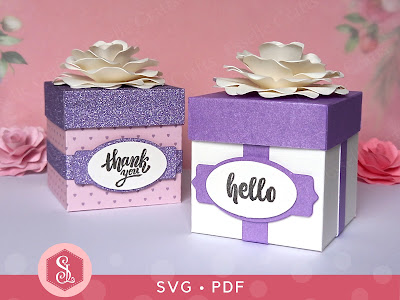
Flower Topped Favour Box

These adorable little flower topped favour boxes are perfect for wedding favours, bridal showers, Mother's Day celebrations and so much more!


Complete with an optional blank label, they can easily be customized for any occasion and can be filled to the brim with sweets or small treats!

Saturday, 16 February 2019

Paper Flower Tutorial

Following on from my paper rose tutorial, I now have a video showing how I create the different paper flowers that adorn the top of some of my teapot boxes. They are really simple to make and, I think you'll agree, they give the teapots a more elaborate quality!


I hope this inspires you to create some of your own different paper flowers. You can use a matching colour or a contrasting colour to add that extra special finishing touch to your teapot boxes.


Sunday, 15 March 2015

Teapot Flower Tutorial

For every teapot box I create, I always enjoy working on the finishing touches and little details that make each one totally unique. I usually decide to make a flower to go on the lid, and over the years I have incorporated several different designs.

I still use the original, spiral technique on many of my teapot boxes as I feel this creates a nice round shape similar to that of a real teapot - plus they're so quick and easy to make!


For my steampunk-inspired teapot boxes, I created a small pressure gauge and a mini top hat to fit in with the overall design.


However, I would like to share a short tutorial on how I create this other flower design. They are really easy to make and I think the effect compliments the teapots perfectly.


First, I start with four squares cut out of thick paper or thin cardstock (I used cardstock for these photos) and one small circle.


Then I fold each square in half, and again into thirds to create a point. A simple petal shape is then cut out.


After cutting off the point to create a small circle in the middle of the flowers, I then cut one petal off one flower, two petals off another and cut a third one in half. This leaves me with one whole flower with six petals, one with five, one with four and so on down to one petal.


Next, I start to apply glue to each of the flowers and stick the two ends together, curling them as I go.


Once they are dry, I stick the circle to the underside of the flower with six petals. This forms the base.


Then I stick each of the other flower sections on in turn, finishing with the one-petal flower in the middle.


The flower is then ready to glue to the teapot lid.


Because I used card for this flower, the edges of the petals are quite jagged, and I think this creates an interesting effect, similar to that of a real flower.

I hope this inspires you. And if you make one of my teapots using my template then you really can choose to finish off the lid any way you want!

Happy crafting!