Tuesday, 19 March 2024

Layered Butterflies

My Butterfly Favour Bag has been hugely popular recently and I've had several people ask if I have any other butterfly designs that could be added to the bag.


This is something that I'd considered doing when I designed the first one and so, as I loved doing it, I have designed three more!

The first one (that comes with the bag) is a likeness of a Small Tortoiseshell butterfly and the others are likenesses of a Peacock, a Monarch and a Speckled Wood butterfly.

I have the whole set of four butterflies available in my Etsy shop as SVG cut files as well PDFs if you prefer to cut out by hand.

They are so delightfully versatile and, as well as adding them to the favour bags, they can be used for all sorts of different papercraft projects.

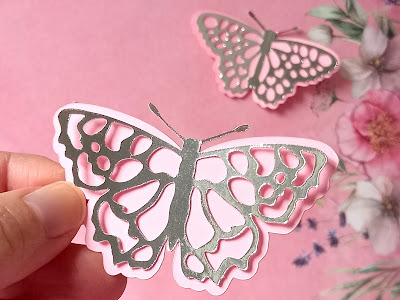
Here I've used two of them on a greeting card. 


The butterflies are super easy to assemble (consisting of only two layers) and look amazing with the top layer cut out of mirror card.

2 Layered Butterfly Designs by Esselle Crafts

I can't wait to see what you use them for! 🦋

Happy crafting
Suzanne

Wednesday, 13 March 2024

Business Card Box

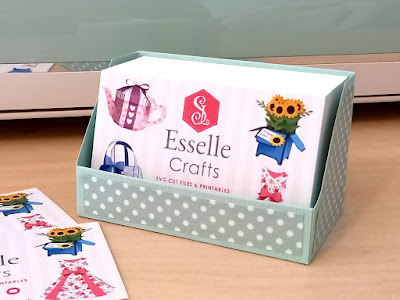
I recently updated my business card design to include my new website and some of my favourite 3D papercraft projects, and I'm so pleased with how it's turned out!

So, this got me thinking ... How can I safely store and present my lovely new set of 100 business cards, whilst keeping consistent with my brand?

And, of course, it had to be a handmade box!

This is how I made it ...

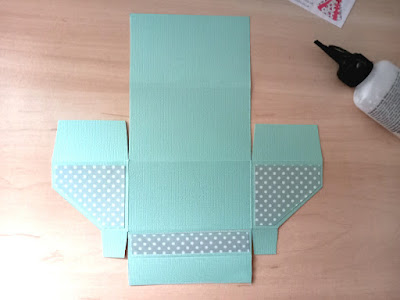
I started by measuring the set of cards and worked out that I needed a 20cm x 20cm piece of cardstock. I chose the lovely vintage mint green colour to match my brand (and my Cricut Explore 🥰). I then used my scoring board to score the lines shown below and drew the diagonal lines at the sides with a pencil.

I folded and burnished the score lines, then cut the tabs as shown below.

Next, I added some patterned paper panels to the front (measuring 8.5cm x 1.5 cm) and the two sides (measuring 4.5cm x 5cm with the diagonal lines at 1.5cm).

I then glued the two larger side tabs to the back.

Then glued the two smaller tabs to the front and folded the front over, gluing it in place for a neat finish.

I did the same with the back, folding it over and gluing it in place. This also gives the back extra strength.

I love how it looks, and I know that my business cards will now be safe and nicely presented for anyone who wishes to take one 🥰

Will you be giving this a try?

Happy crafting!
Suzanne

Wednesday, 28 February 2024

PDF Rose Tea Party Set

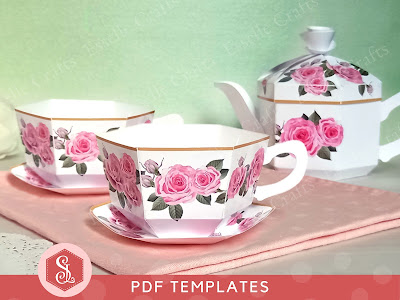
In anticipation of warmer, sunny days and with Mother's Day on the horizon, I have created this pretty printable rose tea party set!

Consisting of a beautiful teapot box with removable lid and a matching teacup and saucer these easy to assemble favour boxes are certain to delight and will be the talk of the party!


I've also included a larger version of the saucer, which will make a perfectly matching tea plate / side plate, just right for holding wrapped chocolates or biscuits!

The templates are available as full colour PDFs and are designed for use on A4 photo quality paper (white, glossy 220-250gsm / 80-90lb recommended), however they can be re-sized before printing. All of the instructions are written clearly in English.

To make your very own rose favour box tea set, you will need:


* Computer and printer to print the PDF templates
* Plain white cardstock or photo quality paper (glossy 220-250gsm / 80-92lb recommended)
* Craft glue / double-sided tape
* Craft knife / scissors
* Scoring tool
* Ruler

Approximate dimensions of teapot box: 16cm (W) x 10.2cm (H) x 7.8cm (D) / 6.3" (W) x 4" (H) x 3.1" (D).

Approximate dimensions of teacup: 11cm (W) x 4.7cm (H) x 8cm (D) / 4.3" (W) x 1.85" (H) x 3.15" (D).

Approximate dimensions of tea plate: 12cm (W) x 1.2cm (H) x 11cm (D)  /  4.7" (W) x 0.5" (H) x 4.3" (D). 

Watch my video tutorial showing how to assemble the boxes and be sure to follow the tips below:


TIP 1 : Printing the PDF templates onto glossy photo paper will give the boxes a realistic, shiny finish.

TIP 2 : Match the patterned hexagon with the pattern on the saucer (and the tea plate) to give it a seamless look.


TIP 3 : For the teapot lid, start at the left side and tuck the six flaps into each other so that they all meet in the centre.

You can print and make as many of these items as you wish and fill them with lots of little treats! Perfect for Mother's Day celebrations, wedding favours, afternoon tea parties and so much more!

I really hope you like this pretty tea set and will feel inspired to create your very own! 

Suzanne