If you've ever struggled to know what to buy someone as a gift, you will have undoubtedly opted for a gift card at some point. But how can you turn that gift into something fun and memorable? By making your very own personalised gift card holder, of course! 🎁
Disguised as a Christmas stocking, this interactive gift card holder is super easy to assemble and will bring an element of surprise to your gift recipient! 🎁
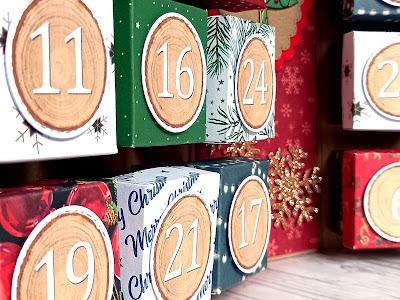
This year, I decided to make my own eco-friendly advent calendar! Although very time-consuming it was so worth the effort and it looks amazing! It can be reused year after year and can be filled with lots of different treats!
To make this advent calendar, I used:
festive patterned cardstock 230gsm / 85lb
festive patterned paper 90gsm / 33lb
thick card, such as grey board
strong tape, such as duct tape
brown wrapping paper
white cardstock 220gsm / 80lb
scissors / craft knife / paper trimmer
ruler
scoring board
craft glue
circular stitched die 4cm / 1.57" diameter
Sizzix Big Shot Foldaway
used Christmas card embellishments
Here's my video tutorial showing how I made it:
For the box lids, I cut out 24 pieces of patterned cardstock, each measuring 9.8 x 9.8cm / 3.85 x 3.85" and scored them at 1cm and 2.5cm / 0.4" and 1" on all four sides.
For the box bases, I cut out 24 pieces of patterned cardstock, each measuring 14.5 x 14.5cm / 5.7 x 5.7" and scored them at 1cm and 5cm / 0.4" and 2" on all four sides.
Next, I cut out two pieces of thick card, one for the front and one for the back, each measuring 17.5 x 24cm / 6.9 x 9.45" and another piece for the spine, measuring 9cm x 24cm / 3.5 x 9.45".
I used brown wrapping paper to cover the outside of the calendar and left approximately 2.5cm / 1" around the outside. Then I cut another piece to cover the inside of the spine, measuring 23 x 13cm / 9 x 5" and two pieces (one to cover the inside front and one to cover the inside back) measuring 23 x 16.5cm / 9 x 6.5".
I cut two decorative patterned paper panels for the front and back covers, each measuring 17 x 23.5cm / 6.7 x 9.25" and another panel for the spine, measuring 8.5cm x 23.5cm / 3.35 x 9.25".
I also cut a piece of patterned cardstock to cover the inside of the spine, measuring 8.5 x 23.5cm / 3.35 x 9.25".
I typed the numbers 1 - 24 onto images of a woodgrain slice, printed them onto white cardstock, then cut them out using a circular stitched die 4cm / 1.57" diameter.
Before I attached the boxes, I arranged them so that they were evenly spaced.
I then added three layers of scrap cardstock behind each of the numbers to give them more dimension. (Foam pads would work just as well, but, as you know, I don't like to use them.)
Once it was all assembled, I decorated the calendar with embellishments I'd saved from used Christmas cards!
It really was such a worthwhile project to make and will undoubtedly be a talking point for many years to come! I hope I have now inspired you to make one of your own!
This was a challenge: what could I create using the remains of some Christmas crackers?
They were too beautifully patterned to throw away, so I started thinking, and decided to try another altered tin design.
And here is the result!
With the addition of some paper flowers, a small key, a paper doily, some small faux pearls and a printed image of a pocket watch, the theme I was trying to go for was Victorian Music Hall.
I was particularly inspired by this image from City Varieties Music Hall, Leeds.
It would be lovely to use this tin to keep theatre tickets in.
The card was quite thick so I had to separate the layers, and because the top layer was already coated it didn't tear.
I love the shine on the finished item. The coating on the card was already quite shiny, but with the addition of several layers of PVA glue it really sparkles now!