Showing posts with label PDF template. Show all posts

Wednesday, 31 July 2024

Cupcake Favour Boxes

I've given my cupcake favour box photos a little makeover! I originally designed the box to complement my teapot favour box and my teacup and saucer but felt that the photos didn't match. So, here they are!


The boxes are super cute and the template is easy to assemble and, once they are filled with delicious treats or small gifts, they make the perfect addition to any tea party or celebration! 🧁

Saturday, 26 November 2022

How to use my Digital Files

In this post, I will be answering some of the most frequently asked questions about using my digital files. I hope you find this information useful, but if you still have any questions, feel free to contact me through my Etsy shop and I will do my best to answer them.


Please note - all of my SVG files are tested in Cricut Design Space and are cut out using my Cricut Explore Air 2. I also cut out smaller versions (using the small dashed cuts SVG file) on my Cricut Joy. Results may vary with other cutting machines.

Sunday, 19 June 2022

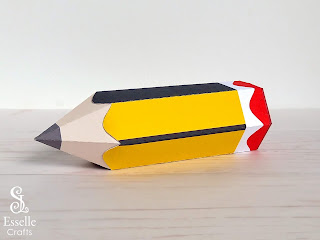
PDF School Pencil Box with Eraser

After recently introducing you to my School Pencil Favour Box PDF template, I have now created a slightly different version, depicting a pink eraser on the end!


Easy to open and close, it can be filled to the brim with sweets or small treats. Ideal for stationery addicts, teacher gifts, back to school gifts, graduation gifts and more!

Monday, 11 April 2022

PDF School Pencil Box

I have now created a full colour PDF template for my School Pencil Favour Box, an idea that I first introduced to you here.

Easy to open, these super cute school pencil boxes can be filled to the brim with sweets or small treats. Ideal for stationery addicts, teacher gifts, back to school gifts, graduation gifts and more!

School Pencil Favour Box by Esselle Crafts

Thursday, 27 January 2022

3D Papercraft Watering Can

Following on from my previous post, where I introduced you to my hexagonal florist box, I decided to use the main design of the box and turn it into a watering can!

3D Paper Craft Watering Can for Small Gifts and Paper Flowers

Isn't it beautiful!

Easy to assemble, this fabulous 3D watering can is perfect for displaying small paper flowers or for gifting sweet treats! Ideal for wedding favours, bridal showers, birthday parties and so much more, the template is available through my Etsy shop as both SVG and PDF.

3D Paper Craft Watering Can for Small Gifts and Paper Flowers

Tuesday, 4 January 2022

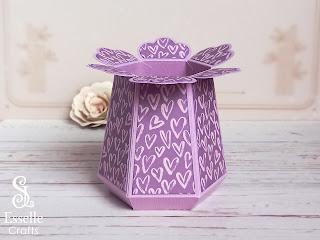
Hexagonal Florist Box

Hello, and welcome to my first project of 2022!

I was asked a few months ago whether I had a template for a florist box. I had never made one before, and the only ones that I could find were square based ones. So, this set me thinking ... as I love working with hexagons, I decided to have a go at creating a hexagonal florist box! And here it is!

Hexagonal Florist Box by Esselle Crafts

Doesn't it look amazing!

Easy to assemble, this fabulous little box is perfect for displaying paper flowers or for gifting small chocolate bouquets! Ideal for wedding favours, bridal showers, birthday parties and more! The template for this florist box is available now through my Etsy shop as both SVG and PDF.

Thursday, 30 December 2021

Updated Pencil Box

Hello, and welcome to my final blog post of 2021!

Towards the end of this year I started making some of my pencil favour boxes for end of term gifts, and it occurred to me that instead of just using a patterned cardstock for the main piece, I could use a plain colour cardstock as a base and add some patterned paper panels on top to give it a smoother, cleaner look. The extra layer also provides added strength to the main part of the box.

3D Paper Craft Pencil Favour Box

Doesn't this one look amazing with its delicate Christmas paper panels? 

Saturday, 23 January 2021

Heart Favour Box

This adorable little heart favour box has an envelope-style lid and can be filled to the brim with sweets or small treats. Easy to assemble, it is perfect for Valentine's Day, wedding table favours, bridal showers and so much more!


Complete with a heart and a cute paper bow, the templates for this box come in both SVG and PDF format, making them accessible for a variety of crafting needs.

Monday, 31 August 2020

Pencil Favour Boxes

I am pleased to announce that I have a new favour box template in my Etsy shop! And here it is!

3D Paper Craft Pencil Favour Boxes for Gifting Small Treats

Easy to open, these super cute pencil boxes can be filled with sweets or small treats. Ideal for stationery addicts, teacher gifts, back to school gifts and so much more!

Saturday, 8 August 2020

Monday, 27 July 2020

NEW Cactus Favour Box

As I am continuing to convert some of my PDF templates to include SVG cut files, I am excited to share with you my latest favour box design!

These cute little cactus boxes are so easy to make and look so realistic with their gorgeous paper flowers on top.

If you're having a garden party they would be perfect for holding sweets or small treats. But if you don't want to use them as favour boxes, you could give one as a new home gift, or maybe make several and display them in a row on a shelf or a sunny windowsill.

Monday, 25 May 2020

SVG Cut Files

I've recently had lots of enquiries from people asking if my papercraft templates are compatible with digital cutting machines. Up until now, I've only been selling my templates as PDF files, but that's all about to change.

I am in the process of converting some of my templates into SVG cut files and, I have to admit, it has been a lot less scary than I thought it would be.

Sunday, 4 August 2019

Textured Evil Queen Crown

In previous posts, I showed you how to create two different versions of my Evil Queen crown. I started with the black one, which I created using core'dinations Colour Core cardstock (Black Cat, 250gsm), and then I made the gold one, which I absolutely love for its simplicity and shine!

Monday, 18 February 2019

Miniature Tea Set

So, I challenged myself to see just how small I could make a paper teapot and teacup using my templates ... and this is the result!


Aren't they cute?

I scaled the teapot template down to approximately 11% and the teacup template to approximately 7% of the original size.


Yes, they were extremely fiddly to make, but if you fancy making one yourself, or if you think you can make one even smaller, then just remember, the smaller the size of the template, the thinner the paper or card you will need to use.

You can find the PDF templates for these items, and more, on my Etsy shop.

Happy crafting!

Wednesday, 30 August 2017

Evil Queen Crown Template

So many people have been kind enough to comment on how much they love my Evil Queen Crown, but they imagine that it is fiddly to make. Whilst the finished structure appears quite complicated, it really is so simple to create.


My first blog post about the crown shows the different stages in creating it, and below is my video tutorial for my gold Evil Queen Crown. But for those of you who prefer to work with a template - good news! I have just created one!


The PDF template is designed to fit on A4 (but can be resized) which will make a crown with a 3cm headband. It has clear instructions (in English) and can be purchased and downloaded through my Etsy shop here.

To make your very own Evil Queen Crown, you will need:
  • PDF template
  • Cardstock (250gsm recommended)
  • Craft knife or scissors
  • Scoring tool
  • Ruler
  • PVA Glue
  • Embellishments (optional)

For my original black crown I used core'dinations Colour Core cardstock (Black Cat, 250gsm) and for the gold crown I used matt gold card.

Perfect for fancy dress costumes and Halloween, I hope you are inspired to create your own.

Saturday, 1 July 2017

Gold Evil Queen Crown


I am so excited to share this tutorial! If you liked my previous Evil Queen crown tutorial, then I am certain that you will love this!

Inspired by the gold crown in The Huntsman: Winter's War, it is really simple to create.


I have a template in my Etsy shop for this crown, available as both SVG and PDF, or you can follow the simple instructions below.

Starting with 2 strips of shiny gold cardstock, 3cm wide, glue the ends together so that it is big enough to sit on the crown of your head.


Next, glue an extra piece of gold cardstock to the inside front (using the following template) to represent the familiar widow's peak.


Using the following template, cut 6 small 'spikes' out of gold cardstock and 1 slightly taller 'spike' for the front of the crown.


Then, using PVA glue, attach each 'spike' to the crown as shown, making sure they are all evenly spaced and secure.


If you wish, you can draw a pattern around the crown using something like 3D Clear Gloss Finish, making sure to seal all of the joins. This is what I did with my original black Evil Queen crown.


To give it an aged metal look, lightly apply Rub 'n Buff (Antique Gold, or similar) to each of the raw edges and quickly blend it in before it dries.

The finished crown. I hope you like it, and are inspired to create your own!

Tuesday, 25 August 2015

Beach Hut Boxes

With the arrival of long, hot summer days (and spending far too much time on the beach) I soon had a new gift box design in mind - in the shape of a cute little beach hut!

Beach Hut Favour Boxes for Beach Theme Party Gifts

I started with a simple box design, then developed an idea for the roof so that it would open whilst staying attached.

Beach Hut Favour Boxes for Beach Theme Party Gifts

Tuesday, 15 October 2013

DIY Evil Queen Crown


OK, so this isn't in any way a gift box or a gift, but I wanted to show this tutorial in case anyone else wanted to create one.

An Evil Queen costume is nowhere near complete without an evil-looking crown, and as I couldn't find one that I really liked, I chose to make one myself.


Starting with 2 strips of black cardstock (250gsm recommended), 3cm wide, I glued the ends together so that it was big enough to sit on the crown of my head.


I created a template for the next part, cutting out 6 small 'spikes' out of black cardstock, and 1 slightly taller 'spike' for the front:


Using PVA glue, I attached each 'spike' to the crown as shown, making sure they were all evenly spaced.


To the front, I glued on an extra piece of black cardstock (using the following template) to represent the familiar widow's peak.


I then carefully drew a pattern all the way around the crown using 3D Clear Gloss Finish, making sure to seal all of the joins.

To give it an aged metal look, I lightly applied silver ink to each of the edges and quickly blended it in with a sponge before it dried. (You could also try a textured look for your crown by following this tutorial.)


Finally, to add some sparkle, I added several black and silver jewels to the front, and sprayed the whole crown with Spray and Shine.


The finished crown. I hope you like it, and are inspired to create your own! If, however, you prefer to use an actual template, you can find one that I designed in my Etsy store.